var c = document.getElementById("c"),
  width = 640 * 0.5,
height = 480 * 0.5;-
Jump To …
+
Raytracing
Raytracing is a relatively simple way to render images of 3D objects. The core is an elegant idea, that one can simulate the real-world behavior of photons of light bouncing off of surfaces and colors accumulating from their paths. It’s not inherently fast, but the simplicity of the core lets it model interesting things like reflections and depth of field in ways that mirror natural processes.
CS 301: Raytracing
This happens to be a popular subject for education: implementing a raytracer requires a student to understand vector math, fast code, and even recursion. The reward is a pretty image - more compelling than the blasé debug output that students get from most assignments.
But it’s still hard to learn: explanations are written either in the language of mathematics or programming, and rarely connect all the dots. Raytracer implementations tend to extremes: one fits on a business card, another supports nearly every potential feature, and most of the rest are homework assignments, implemented just enough to run, never enough to have comments and documentation.
Literate Raytracer
Literate raytracer is a simple implementation of raytracing in Javascript. It’s made to be read as a narrative, and intends to explain vector operations as well.
Setup
Get a context in order to generate a proper data array. We aren’t going to use traditional Canvas drawing functions like
fillRect- instead this raytracer will directly compute pixel data and then put it into an image.c.width = width; c.height = height; var ctx = c.getContext("2d"), data = ctx.getImageData(0, 0, width, height);The Scene
var scene = {};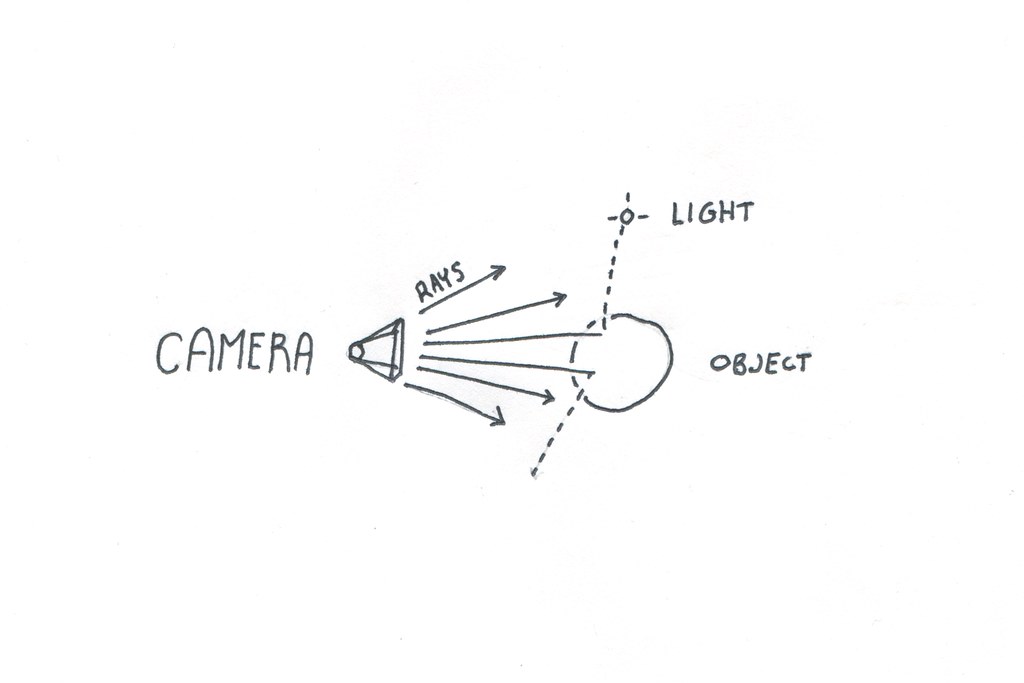
We need to define three different kinds of things in 3D space: a camera from which we cast rays into the scene, objects that can be hit by those rays and are drawn into the scene, and lights that change the color of rays, by extension coloring objects.
In this case, we define these objects as simple objects with vectors defined as
{x, y, z}objects.The Camera
Our camera is pretty simple: it’s a point in space, where you can imagine that the camera ‘sits’, a
fieldOfView, which is the angle from the right to the left side of its frame, and avectorwhich determines what angle it points in.scene.camera = { point: { x: 0, y: 1.8, z: 10, }, fieldOfView: 45, vector: { x: 0, y: 3, z: 0, }, };Lights
Lights are defined only as points in space - surfaces that have lambert shading will be affected by any visible lights.
scene.lights = [
  {
    x: -30,
    y: -10,
    z: 20,
  },
];
Objects
This raytracer handles sphere objects, with any color, position, radius, and surface properties.
scene.objects = [
  {
    type: "sphere",
    point: {
      x: 0,
      y: 3.5,
      z: -3,
    },
    color: {
      x: 155,
      y: 200,
      z: 155,
    },
    specular: 0.2,
    lambert: 0.7,
    ambient: 0.1,
    radius: 3,
  },
  {
    type: "sphere",
    point: {
      x: -4,
      y: 2,
      z: -1,
    },
    color: {
      x: 155,
      y: 155,
      z: 155,
    },
    specular: 0.1,
    lambert: 0.9,
    ambient: 0.0,
    radius: 0.2,
  },
  {
    type: "sphere",
    point: {
      x: -4,
      y: 3,
      z: -1,
    },
    color: {
      x: 255,
      y: 255,
      z: 255,
    },
    specular: 0.2,
    lambert: 0.7,
    ambient: 0.1,
    radius: 0.1,
  },
];
Throwing Rays
This is one part where we can’t follow nature exactly: technically photons come out of lights, bounce off of objects, and then some hit the ‘eye’ and many don’t. Simulating this - sending rays in all directions out of each light and most not having any real effect - would be too inefficient.
Luckily, the reverse is more efficient and has practically the same result - instead of rays going ‘from’ lights to the eye, we follow rays from the eye and see if they end up hitting any features and lights on their travels.
For each pixel in the canvas, there needs to be at least one ray of light that determines its color by bouncing through the scene.
function render(scene) {first ‘unpack’ the scene to make it easier to reference
var camera = scene.camera,
  objects = scene.objects,
  lights = scene.lights;
This process is a bit odd, because there’s a disconnect between pixels and vectors: given the left and right, top and bottom rays, the rays we shoot are just interpolated between them in little increments.
Starting with the height and width of the scene, the camera’s place, direction, and field of view, we calculate factors that create
width*heightvectors for each rayStart by creating a simple vector pointing in the direction the camera is pointing - a unit vector
var eyeVector = Vector.unitVector(
    Vector.subtract(camera.vector, camera.point)
  ),
and then we’ll rotate this by combining it with a version that’s turned 90° right and one that’s turned 90° up. Since the cross product takes two vectors and creates a third that’s perpendicular to both, we use a pure ‘UP’ vector to turn the camera right, and that ‘right’ vector to turn the camera up.
vpRight = Vector.unitVector(Vector.crossProduct(eyeVector, Vector.UP)),
vpUp = Vector.unitVector(Vector.crossProduct(vpRight, eyeVector)),
The actual ending pixel dimensions of the image aren’t important here - note that
widthandheightare in pixels, but the numbers we compute here are just based on the ratio between them,height/width, and thefieldOfViewof the camera.fovRadians = (Math.PI * (camera.fieldOfView / 2)) / 180, heightWidthRatio = height / width, halfWidth = Math.tan(fovRadians), halfHeight = heightWidthRatio * halfWidth, camerawidth = halfWidth * 2, cameraheight = halfHeight * 2, pixelWidth = camerawidth / (width - 1), pixelHeight = cameraheight / (height - 1); var index, color; var ray = { point: camera.point, }; for (var x = 0; x < width; x++) { for (var y = 0; y < height; y++) {turn the raw pixel
xandyvalues into values from -1 to 1 and use these values to scale the facing-right and facing-up vectors so that we generate versions of theeyeVectorthat are skewed in each necessary direction.var xcomp = Vector.scale(vpRight, x * pixelWidth - halfWidth), ycomp = Vector.scale(vpUp, y * pixelHeight - halfHeight); ray.vector = Vector.unitVector(Vector.add3(eyeVector, xcomp, ycomp));use the vector generated to raytrace the scene, returning a color as a
{x, y, z}vector of RGB valuescolor = trace(ray, scene, 0); (index = x * 4 + y * width * 4), (data.data[index + 0] = color.x); data.data[index + 1] = color.y; data.data[index + 2] = color.z; data.data[index + 3] = 255; } }Now that each ray has returned and populated the
dataarray with correctly lit colors, fill the canvas with the generated data.ctx.putImageData(data, 0, 0); }Trace
Given a ray, shoot it until it hits an object and return that object’s color, or
Vector.WHITEif no object is found. This is the main function that’s called in order to draw the image, and it recurses into itself if rays reflect off of objects and acquire more color.function trace(ray, scene, depth) {This is a recursive method: if we hit something that’s reflective, then the call to
surface()at the bottom will return here and try to find what the ray reflected into. Since this could easily go on forever, first check that we haven’t gone more than three bounces into a reflection.if (depth > 3) return; var distObject = intersectScene(ray, scene);If we don’t hit anything, fill this pixel with the background color - in this case, white.
if (distObject[0] === Infinity) {
  return Vector.WHITE;
}

var dist = distObject[0],
  object = distObject[1];
The
pointAtTimeis another way of saying the ‘intersection point’ of this ray into this object. We compute this by simply taking the direction of the ray and making it as long as the distance returned by the intersection check.var pointAtTime = Vector.add(ray.point, Vector.scale(ray.vector, dist)); return surface( ray, scene, object, pointAtTime, sphereNormal(object, pointAtTime), depth ); }Detecting collisions against all objects
Given a ray, let’s figure out whether it hits anything, and if so, what’s the closest thing it hits.
function intersectScene(ray, scene) {The base case is that it hits nothing, and travels for
Infinityvar closest = [Infinity, null];But for each object, we check whether it has any intersection, and compare that intersection - is it closer than
Infinityat first, and then is it closer than other objects that have been hit?for (var i = 0; i < scene.objects.length; i++) { var object = scene.objects[i], dist = sphereIntersection(object, ray); if (dist !== undefined && dist < closest[0]) { closest = [dist, object]; } } return closest; }Detecting collisions against a sphere
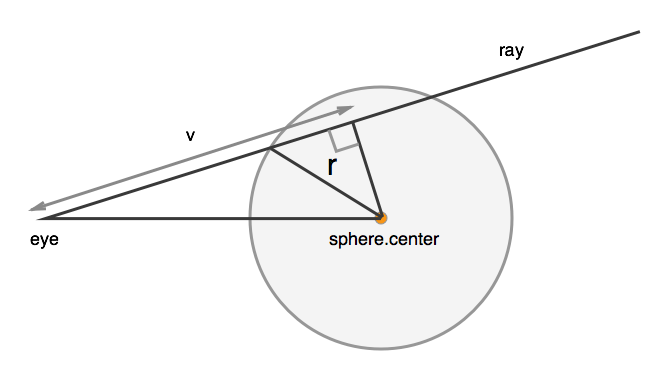
Spheres are one of the simplest objects for rays to interact with, since the geometrical math for finding intersections and reflections with them is pretty straightforward.
function sphereIntersection(sphere, ray) {
  var eye_to_center = Vector.subtract(sphere.point, ray.point),
picture a triangle with one side going straight from the camera point to the center of the sphere, another side being the vector. the final side is a right angle.
This equation first figures out the length of the vector side
v = Vector.dotProduct(eye_to_center, ray.vector),
then the length of the straight from the camera to the center of the sphere
eoDot = Vector.dotProduct(eye_to_center, eye_to_center),
and compute a segment from the right angle of the triangle to a point on the
vline that also intersects the circlediscriminant = sphere.radius * sphere.radius - eoDot + v * v;
If the discriminant is negative, that means that the sphere hasn’t been hit by the ray
if (discriminant < 0) {
  return;
} else {
otherwise, we return the distance from the camera point to the sphere
Math.sqrt(dotProduct(a, a))is the length of a vector, sov - Math.sqrt(discriminant)means the length of the the vector just from the camera to the intersection point.return v - Math.sqrt(discriminant); } }A normal is, at each point on the surface of a sphere or some other object, a vector that’s perpendicular to the surface and radiates outward. We need to know this so that we can calculate the way that a ray reflects off of a sphere.
function sphereNormal(sphere, pos) {
  return Vector.unitVector(Vector.subtract(pos, sphere.point));
}
Surface

If
trace()determines that a ray intersected with an object,surfacedecides what color it acquires from the interaction.function surface(ray, scene, object, pointAtTime, normal, depth) { var b = object.color, c = Vector.ZERO, lambertAmount = 0;Lambert shading is our pretty shading, which shows gradations from the most lit point on the object to the least.
if (object.lambert) {
  for (var i = 0; i < scene.lights.length; i++) {
    var lightPoint = scene.lights[i];
First: can we see the light? If not, this is a shadowy area and it gets no light from the lambert shading process.
if (!isLightVisible(pointAtTime, scene, lightPoint)) continue;Otherwise, calculate the lambertian reflectance, which essentially is a ‘diffuse’ lighting system - direct light is bright, and from there, less direct light is gradually, beautifully, less light.
var contribution = Vector.dotProduct(
  Vector.unitVector(Vector.subtract(lightPoint, pointAtTime)),
  normal
);
sometimes this formula can return negatives, so we check: we only want positive values for lighting.
    if (contribution > 0) lambertAmount += contribution;
  }
}
Specular is a fancy word for ‘reflective’: rays that hit objects with specular surfaces bounce off and acquire the colors of other objects they bounce into.
if (object.specular) {This is basically the same thing as what we did in
render(), just instead of looking from the viewpoint of the camera, we’re looking from a point on the surface of a shiny object, seeing what it sees and making that part of a reflection.var reflectedRay = { point: pointAtTime, vector: Vector.reflectThrough(ray.vector, normal), }; var reflectedColor = trace(reflectedRay, scene, ++depth); if (reflectedColor) { c = Vector.add(c, Vector.scale(reflectedColor, object.specular)); } }lambert should never ‘blow out’ the lighting of an object, even if the ray bounces between a lot of things and hits lights
lambertAmount = Math.min(1, lambertAmount);Ambient colors shine bright regardless of whether there’s a light visible - a circle with a totally ambient blue color will always just be a flat blue circle.
  return Vector.add3(
    c,
    Vector.scale(b, lambertAmount * object.lambert),
    Vector.scale(b, object.ambient)
  );
}
Check whether a light is visible from some point on the surface of something. Note that there might be an intersection here, which is tricky - but if it’s tiny, it’s actually an intersection with the object we’re trying to decide the surface of. That’s why we check for
> -0.005at the end.This is the part that makes objects cast shadows on each other: from here we’d check to see if the area in a shadowy spot can ‘see’ a light, and when this returns
false, we make the area shadowy.function isLightVisible(pt, scene, light) { var distObject = intersectScene( { point: pt, vector: Vector.unitVector(Vector.subtract(pt, light)), }, scene ); return distObject[0] > -0.005; }Here we do a little fun magic, just for the heck of it. We have three spheres in the scene -
scene.objects[0]is the big one, kind of like ‘Earth’.The other two are little, so let’s make them orbit around the big one and look cool!
The orbits of the two planets. We use some basic trigonetry to do the orbits: using
Math.sin()andMath.cos(), it’s simple to get a unit circle for each planet. Here’s an article I wrote for getting to knowsinandcos.var planet1 = 0, planet2 = 0; function tick() {make one planet spin a little bit faster than the other, just for effect.
planet1 += 0.1;
planet2 += 0.2;
set the position of each moon with some trig.
scene.objects[1].point.x = Math.sin(planet1) * 3.5;
scene.objects[1].point.z = -3 + Math.cos(planet1) * 3.5;

scene.objects[2].point.x = Math.sin(planet2) * 4;
scene.objects[2].point.z = -3 + Math.cos(planet2) * 4;
finally, render the scene!
render(scene);
and as soon as we’re finished, render it again and move the planets again
  if (playing) setTimeout(tick, 10);
}

var playing = false;

function toggle(e) {
  if (playing) {
    e.target.innerText = "Play";
    playing = false;
  } else {
    e.target.innerText = "Pause";
    playing = true;
    tick();
  }
}

render(scene);
Then let the user control a cute playing animation!
document.getElementById("play").onclick = toggle;